Project Sharing Tab
In the Project Sharing tab you can manage the sharing of a project with other users and control which user can edit the project.
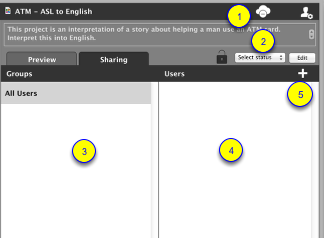
1. Cloud Button - Remove from cloud
This button is for uploading projects to the cloud, removing them from the cloud or syncing the local project with the cloud depending on the icon of the button. The icon in the image above is for removing a project to the cloud as the selected project is stored in the cloud.
2. Project Status
This menu button allows you to set the status of the project to one of created, assigned, submitted, evaluated, reviewed, closed.
3. Groups list
This is a list of all the groups that you are a member of. In this version of VideoLinkwell the groups feature is not fully implemented so you just see the All users group.
4. Users list
This is a list of all the users who are one of your contacts. A user becomes a contact if you have shared a project with them or they have shared a project with you. It will show users a project is shared with by showing a filled in shared user icon.
5. Add Shared User
Use this button to share the selected project with a user who is not yet one of your contacts.
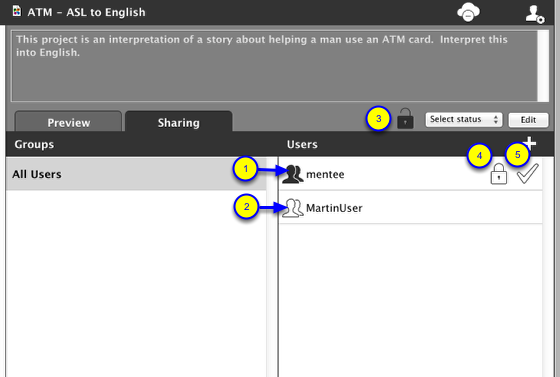
Project Sharing Users List
Project Sharing
The user list will show all users that you have had contact with, which is any users that you are sharing any project with or any users that have shared a project with you. You can tell whether the selected project has been shared with a user by looking at the user icon next to their name. A project can be shared with more than one user.
1. User the project is shared with
When the shared user icon is filled in the project has been shared with the user.
2. User the project is NOT shared with
When the shared user icon is an outline the project has not been shared with that user.
Project owner and project control
Only one user can have control of a project at a time. When a user has control of the project they can edit the project and change the project status. At that time other users who don't have control can only view the project.
The owner of the project is the person who creates the project. Only the owner of a project can change the control of the project. They can give control of the project to a shared user to allow them to edit it or take back control so they can edit it. The following buttons are used to change control of the project.
3. Owner's project lock
This button shows whether the project is locked or unlocked for the owner of the project. If the lock is open and the button is filled the owner can edit the project. If the lock is closed and the button is an outline the owner cannot edit the project. If the project is locked for the owner, clicking this button will give the owner the permission to edit the project. In the image above the project owner currently has the project unlocked for them so they can edit the project.
4. Shared user's project lock
This button shows whether the project is locked or unlocked for a user the project is shared with. If the lock is open and the button is filled the user can edit the project. If the lock is closed and the button is an outline the user cannot edit the project. The owner of the project can click this button next to the shared user's name to unlock it for them and allow them to edit the project. In this case the shared user mentee cannot edit the project because it is locked for them.
5. Project accepted checkmark
This icon shows whether the shared user has accepted the project. If the checkmark is filled then the user has accepted. If the checkmark is an outline the user has not yet accepted the project. In this case the shared user mentee has not accepted the project yet.